Showing posts with label Distress ink. Show all posts

Monday, 13 February 2012

Demo cards

Good morning!


This miserable weather is not making me want to go out today. Bahh!
I have had a nice weekend with a demonstration on Saturday at Crafts U Love. I met lots of lovely crafters and got to play a bit as well. And when I got home my new laptop had been delivered - yay! I am writing this post on it and I can tell you, it is soooo nice not to have to wait five minutes for every action to actually happen on the screen! My old trusty MacBook was getting too slow for me after 6 years of service and I was wanting to scream every time I needed to do some work in Photoshop!
Yesterday I had to get out of the way of my darling hubby as he was working on our kitchen redo and not in a good mood... which didn't help my mood either, so being apart was better for all involved *lol*.
Right, back to the demo, I had prepared 10 cards that used the Hero Arts/Sizzix stamp and die combos (as well as a HA Art of the Card set together with Distress Inks.
I didn't get a chance to take pics at home so these were done in the shop and accordingly I couldn't do much about the lighting... I also only noticed at home I forgot to take a picture of one card (you might see a blue eiffel tour card peeking in on some of the pictures, that one I didn't take a photo of :-( A bit miffed with myself as I really liked that one. Might try to get one when I next go to the shop.


Starting with the Cupcake Set, this green card was a quick one where I coloured one die cut cupcake with Peeled Paint  and Worn Lipstick DIs and sponged the frame as well as stamping the second cupcake directly onto the green mat. The stripe on the ribbon was done with the same DI with the help of good old sello tape.


On the next card I played with the frame die a bit and cut an aperture into the from of the card and stamped the coordinating image inside on some patterned paper. I put acetate over the front and stamped the sentiment with Stazon on it. A bit of sponging to the frame cut out and the patterned paper on the front (Victorian Velvet) and then I cut out the middle by tracing the outside of the die onto the paper. Both cupcakes were stamped and cut then coloured with Victorian Velvet and decorated with pearls, gems and a bit of glitter.


For the last cupcake one I stamped the sentiment repeatedly onto white card in Smokey Gray (Versafine) and Spun Sugar and Worn Lipstick DI then placed the frame die in the middle, tracing the outside with a  black pen and placed silver pearls in every scallop. Before taking the die off I lightly sponged pink ink around the outside, leaving the middle part white. Stamped and die cut cupcakes on foam pads inside the frame were coloured with Wild Honey and Worn Lipstick and the right one has some paper piecing done to the lower part.


Next I played with the Victorian style Ladies in hats. First up an easy number. I die cut the large image from scrap paper and sponged onto the card directly with Spun Sugar DI. Then I overstamped that with Versafine Smokey Gray and added a sentiment and a ribbon with bow. A pink pearl to resemble an earring and some accent colouring to finish.


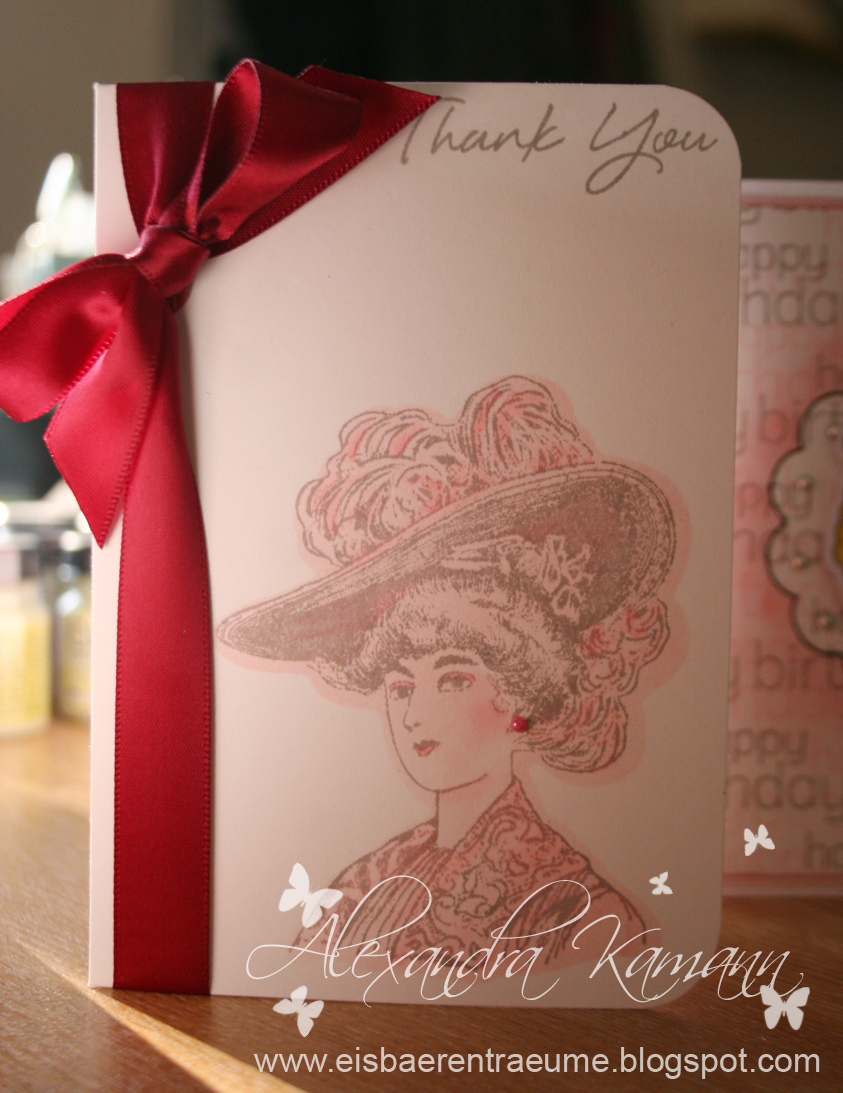
The tall lady in the set was what I wanted to feature in the next card. I stamped with Worn Lipstick DI and die cut her after dragging the colours out with a water brush. The beautiful DP was distressed a little on the edges with Worn Lipstick and I matted onto dark pink card. Sentiment and pink pearls were added and that's it, easy peasy :-)


The last of the ladies was stamped in Versafine Vintage Sepia and then water coloured with Vintage Photo DI. I used the same ink to stain my originally white ribbon and to add some depth to my heart embellishment (made with card stock, glossy accents and Distress Crackle Paint). The background paper was stamped with the tall lady in Vintage Photo again and sponged, edges distressed and sponged some more and I added some dark brown card as well as a pearl earring to the die cut lady.


On to the Style is Eternal set... Wasn't sure if I liked this at first but now I love it.
I used the Art of the Card Paris, France set to make a panel first, stamping randomly in Peeled Paint and Broken China DI, then sponged the middle in Broken China (lightly!) and the edges in Peeled Paint before spritzing with a little pearlised water. It doesn't show much in the picture but it gives a subtle sheen as well as delicate splatter pattern, love the effect! Layered this over slate blue card stock and stamped sentiment on in Versafine Onyx Black. Then I stamped and die cut the handbags, coloured with DIs (colours as before) and added gems, the black bag in the middle is covered in glossy accents. The were adhered with foam pads for some pop.


The next card was totally inspired by the gorgeous paper that I wanted to take centre stage. I matted it on dark pink card stock and went on to stamp the eiffel tower, handbag and the girl before cutting them out. The eiffel tower was then sponged with Weathered Wood DI, the girl and handbag were coloured with DI in Seedless Preserve and Tattered Rose. I made her a little corsage by punching a flower from my mat card stock and adding a sticky gem. I also added 3 little pink pearls to the paper and stamped the sentiment, sponging it lightly with Victorian Velvet DI.


I was a little disappointed at first that I couldn't colour the girls dress, but then more of this fab Designer Paper inspired me to think of other solutions. I coloured the girl with Tattered Rose and a bit of Worn Lipstick (lips and headband) and then covered her dress and one of her bags in wet glue and sprinkled glitter on. The other bag was paper pieced. I didn't want to hide too much of the paper so only added the sentiment, matted onto dark pink card, and sponged it lightly with Vintage Photo DI.


This was all I prepared (well, apart from the one I forgot to photograph...), but I have one more card to show, which I made during the demo.

I made the backing paper with the Art of the Card Paris, France set again using all shades of pink that the DIs come in (Spun Sugar, Worn Lipstick, Victorian Velvet and Tattered Rose) for stamping, then sponging it all with Spun Sugar. The girl was coloured with Tattered Rose and Worn Lipstick with a tiny bit of peeled paint for eye shadow. For the mat I used a dusky pink card that I also used to mat the little sign for the sentiment. Raffia acts as string and I added Viva Pearl Pen in black to the corner for balance.


Phew... that was a lot! Thanks for staying here til the end and hope you liked todays offering!

Thursday, 9 February 2012

More Glitterpot class cards

Hello again!
I did mean it, when I said I'll be here more often now! *lol* It might not be every day but as often as I can.
As I said on my last post, I still have some cards left to share that I did recently and today it's some more Glitterpot class cards.


This first card uses the Large Flower Background stamp from Hero Arts, which I absolutely love. I coloured it with Copics ( YG61, BG01, BG000, R81, R83, Blender 0) and cut out the middle part with Labels Four from Spellbinders. For the mat layer I cut scalloped borders from pink Bazzil card, put my image panel on top and put the label die in the aperture again. Then I traced the inside of the die onto the pink card and cut that out by hand to get that small border all around.
The large flower to the right was trimmed out from a second print of the stamp, again coloured with Copics (R81, R83, R85, YG61, YG63, YG67, Blender 0) and adhered with silicon glue for a bit of depth. Sentiment is from a Personal Impressions set called Big Sentiments, designed by Paula Pascual and stamped in Versafine Smokey Gray.


Here is a detail view where you can see the dimension of the flower a bit better:


The cut-outs from the above card seemed a shame to throw away, so I added a bit of doodling, ribbon and a sentiment (Hero Arts - Say it all) and made this:


As I said, I love this stamp so couldn't quite leave it alone. For the next card I stamped on watercolour paper and coloured with distress inks. Colours used are: Wild Honey, Mustard Seed, Forrest Moss and Broken China. I matted onto sunshine yellow card and added a turquoise butterfly and banner with heat embossed white sentiment (PI - Big Sentiments).


I played around with watercolour paper and Distress Inks with this stamp some more but not made them into cards yet, this one is stamped in Versamark and heat embossed in white before colouring.


And this one is heat embossed as the above, then sprayed with water and coloured with my fingers dipped into ink. This gives a very soft look.


For the next cards I used a Hero Arts set called "Greetings" and stamped the butterfly collage in Vintage Sepia and again in Onyx Black, trimming the butterfly out of the black after colouring it in pencil.
I distressed the brown with DI in Gathered Twigs and did the same to the Echo Park paper. The image was matted onto turquoise card and set at an angle over dark brown card, sandwiching some white twill ribbon I coloured with Copics to match the butterfly.


Here you can see the butterfly is glued only at the body part and the wings are lifting off the card.


For my last card for now I used the typewriter collage stamp from the set in a similar way, stamping in mauve and grey before cutting and reassembling with a bit of silicon glue. Some pink card and more Echo Park paper and ribbon to finish.


That's it for today, hope you like my projects and thanks for stopping by. If you leave me a comment I'll try my best to return the favour and visit your blog as well!

Monday, 16 January 2012

First cards for Hobby Art

Hello there!

Surprised to see me blogging again only two days after my last post? Hehe, I intend to be better at this blog than I used to be. I know I said it before but I really am trying to be a good blogger now!

As I had promised in my last post, I have some pictures for you of cards I made with the gorgeous Hobby Art stamps. The playday had its effect on me and I really enjoyed making these.
So here we go, first up the cards I made with the artwork that I made on the Saturday at Hobby Art after the tutorial by Kim.


This was the first card I made with the faux mother of pearl technique. I used Seedless Preserves Distress ink and on top of acrylic pearly paint and stamped the script background in the same ink. I stamped the Bordered Poppies stamp in Versafine Black and coloured with several Distress Inks before glazing the flower heads with Glossy Accents.
For the background I stamped the single poppy stem from the Poppies Scene-it set all over randomly (in Dusty Concord DI) and sponged some more on the edges and the flower heads.
My main panel was wrapped with ribbons and matted onto lilac pearlescent card before mounting the whole thing onto a purple card blank.
Here is a close up of the poppies:


After lusting over the colours that Jane had used I had a go myself with those same colours, here is the result:


I really like the pop of the colours in contrast to the black card blank. I used Iced Spruce, Evergreen Bough and Scattered Straw on the image, mounted onto yellow-orange cardstock and tied some black embroidery floss around before mounting onto the card. Simple, but I love this one!

Next up was my attempt to use some Copics with the faux mother of pearl technique...


I used Rusty Hinge, Wild Honey and Mustard Seed on the background, stamped the poppies and leaves with Memento ink and coloured with Copics. I stamped the large flower heads again on some spare card and coloured them in with Copics before fussy cutting and glueing them in place. I am not quite sure if they just pop more that way or if it looks a little weird with the stark highlights on the soft backdrop...? 
I matted onto red and copper metallic card before mounting onto a square cream card base that I had embossed with a square frame. The sentiment is from the Scene-it Sentiments set.

Jenny also let me have a go at the new Roses and Lilies sets and here is what I made with them:


I really fancied colouring on Kraft card again after not having done that for a while and thought these images would be nice for that. Here I used the large Lilies image and coloured it in with pencils before cutting it out with a Nestie shape and making a light green matt for it. I matted the background paper (SU) onto the same cardstock and used some yellow gingham (Papermania) for the panels behind the foam popped image. Some small pearls to add interest and sentiment from the Friends set by Hobby Arts. Not entirely happy with how that turned out as I added it after the rest of the card was finished and it didn't come out properly, but I think I can just about get away with it.


This one is the large Rose image, again stamped onto Kraft card and coloured with pencils. I went for a bit of a vintage look on this and used some lace I got from my late grandmother to frame the image. I cut it out with a Nestie oval and glued the lace behind as well as adding a bow made from it to the bottom.
For the backing paper I used more Kraft card and a large piece of lace that I layered over and airbrushed onto the card with Light Walnut Copic. When you remove the lace afterwards you get this lovely soft image of the lace. I lightly distressed the edges to add to the effect and mounted the whole thing onto a black card base.


For my last card I used the same image again but this time used Copics to colour, cutting out with a Nestie circle die and mounting with a yellow scalloped circle. Background paper is that yellow gingham again, layered onto pink card before mounting on to a white square card base. Sentiment is from the Friends set again.

Hope you like my offering for today, I'll be back with more cards soon, promise!

Thursday, 17 February 2011

A tag for you...

Hello bloggers!


Whoo, I had a busy week! Last weekend I had the pleasure of hosting my third annual Sale-a-Bration Stampin up party in my house with the lovely Joanne of mainly-flowers blog fame! She is a truly talented crafter and such a nice person to boost. We had a blast doing our make and take and my lovely friends spent enough so I could grab myself some freebies - I love freebies *lol* (who doesn't?)
I also had some crafting-club fun with my ladies where we made envelope-gift-bags and hanging baskets of love and a card to match. Haven't taken pics yet but will, promise!


Today I want to share something I rarely do, a tag. I am a lover of Papertrey ink goods and the Passion for Papertrey blog asked for a tag in their challenge as did Simon says stamp challenge did too, so here I am with my little tag that will soon find it's way onto a card, I'm sure!


Supplies:
Library card stamp - PTI
Sentiment - part image from "Floral frenzy, PTI
Flourish - "Fancy Flourishes", PTI
Felt butterfly- felt in Ocean Tides by PTI, cut with a Cuttlebug die and stamped with "Background Basics:Text", PTI
Kraft and Rustic cream cardstock - PTI
Spotted ribbon - PTI
Antique lace - from my grandmothers stash!
Ink - Versafine Vintage Sepia and TH Distress Inks in Antique Linnen


The little banner was snipped by hand...


I am entering this in the following challenges:
Simon says stamp and show - Show a tag
Simon says stamp - Create your own embellishment
A Passion for Papertrey - Tag you're it!


Hope you like my little tag and hope to see you soon again on my little blog!

Friday, 11 February 2011

2nd Mo Manning card for teenager

Back again... ;-)


For this card I matted the image (Copics again) onto dark blue cardstock and added the rounded tap punch out (SU) which was stamped with a star and sentiment by PTI. The light blue card was embossed with a Fiskars embossing plate (music notes) and edged with Faded Jeans Distress Ink. The base of the card was stamped with a music note stamp from Impression Obsession in Not quite Navy ink by SU and edged with Faded Jeans again. I wrapped a bit of twine around a corner to finish.

I am entering this into these challenges:


Delightful Challenges - Get Punchy
Craft Your Passion - #44 - Anything Goes
One Stitch At A Time - #48 - Do It With A Digi
Catch The Bug - Anything Goes
Copic Creations - #43 - We're Cool
Little Claire's Designs - #1 - Anything Goes
Stampin' With The Dragon - #19 - Anything Goes

Hope you like them and as always, thank you if you choose to leave a comment!

Just noticed I didn't keep it that brief actually... sorry ;-)


Edit: Oops, didn't realise you had to use animals as the subject for Fuzzy Wuzzy... it would help to read those posts properly, wouldn't it? 

Teenage Boys Cards curtsey of Mo Manning

Hi bloggers,


my little one has been very poorly yesterday and gave his bug to me, so I keep this brief as I have a blazing headache...
I had to make 2 birthday cards for teenage boys, one a keen gamer and the other for a music lover, Mo's digital pencil had the perfect images and as I had them coloured ages ago (I mean months, not weeks!) it was very quick work as well! 


I used a Basic Grey paper for the background and mounted the cut out image (which was coloured with Copics) with foam pads to give a bit of depth. The sentiment is by PTI and stamped onto white card that I distressed with Antique Linen Distress Inks. The border on the side was cut by hand with a homemade template. I pricked holes and added faux stitching as well as distressing again with Distress Inks in Antique Linen.


I am entering this in these challenges:


Craft Your Passion - #44 - Anything Goes
One Stitch At A Time - #48 - Do It With A Digi
Catch The Bug - Anything Goes
Little Claire's Designs - #1 - Anything Goes
Stampin' With The Dragon - #19 - Anything Goes

As I can't post both cards into the same challenge if it's in the same post, I'll repost the second card in a minute....

Wednesday, 26 January 2011

I have a confession...

Hello bloggers.
This morning I have a confession to make. I am a Gleek. I watch Glee almost religiously. It's on on Monday evenings and I record it as I can't always watch Monday nights.
What I love about it most I guess, is that it makes me laugh, it makes me feel cheery and is lighthearted without being totally superficial. Well, I just watched the latest episode called "Grilled Cheesus" and it started just as I was used to it, very funny. But, without wanting to give anything away to others that still want to watch it without spoilers, it turned into something completely different.
It was still great, but let me tell you, my face is red and blotchy right now and I cried almost for the whole of the show! It's about religion, spirituality and what's sacred in life and although I am not really that religious, that didn't matter. It moved me. Very much.
I guess now I can just expand my earlier statement about Glee to : It makes me laugh AND CRY.

Ok, sorry about this diversion from usual things, I just wanted to get this off my chest. I feel better now and I hope I didn't spoil anything for anyone. On to some cards...

These cards were made for two of my best crafty mates, Julie and Lesley, who came to play earlier this month and whose company makes me happy.
Julie had left a couple of things at mine when she left and I sent them
on to her and took the opportunity to slip in a card for her.

I used the "Studio Style" set by PTI, coloured with Copics and white and red cardstock. The twine ribbon is Pure Poppy by PTI. The little notelet was cut by hand and I made holes with the Crop-o-Dile before snipping them. Some light edging with Antique Linen distress ink and some glossy Accents on the button jar to finish.

Lesley let slip on the day she was here that it was her birthday the week after and because she likes frogs I made her this card:

The frog image was a freebie, but I can't find where from :-( Sorry! He is coloured with Copics and cut with a Spellbinders Label die.
The DP is from my scarp box, the scallops were cut with a PTI border die. The flowers are Primas and punched from a SU punch, buttons are PTI and pearl is from stash.
Sentiment by PTI and I inked the edges with Distress inks in Antique Linen.

Hope you like them!

Tuesday, 28 December 2010

I know, I know...

I am a bad, bad blogger. Just can't get myself to be organised enough to do everything I need AND blog. Sorry!!
I have been one busy bee all of december! And I did sooo much I want to show and half of it I didn't even have a chance to take a picture of! Am I b**ed or what? *lol*
But firstly I want to show you what I did before when I was missing in action.
Well, the result of it anyway, the stall I had on the christmas fair. Tell me what you think...


Now, without any info at all, because it is late, I am tired and just can't face typing all the supplies etc. But if you see something you like and want to know more, please just ask and I'll happily help.


This birthday card is for a dear friend whose birthday is tomorrow but as she has no internet at the moment I think it's safe to show it :-)


Sorry about the quality of most of the pictures, I took them in a hurry as they were for a special "occasion" that I don't dare talk about yet :-) Hopefully I can talk/write about it soon...
Right, I am off now, watch a little telly (Overboard is on, with Goldie Hawn, love that movie!) and then bed. Night night bloggers!