Monday 30 January 2012

A challenged card...

Can you believe this? Three posts in one day?? I think I should look out for flying pigs tonight *lol*
I have been a bit poorly and couldn't do a lot apart from sitting wrapped in blankets in my little room so I played some. First I changed my blog design which nearly made my hair fall out! It just didn't do what it was supposed to for quite some time until I figured the problem and then it was done in a few minutes. Hope you like the new look!
When this was done I looked for some challenges and I wanted to use an image from Ruth at A passion for Stamps as I had missed doing that.
Mojo Monday provided a nice sketch:


I took a little bit of liberty with the sketch, changing the square image to an oval one to soften the look a bit. With the stripes it would have been a bit too strict, I think.


I coloured the image with Copics Y17, Y15, Y11 and Y00 for the petals and G28, G24 and G21 for the leaves and stems. The blender pen was invaluable again for the highlights and I used BV000 for some blueish shadows. The background was sponged with Spun Sugar Distress Ink after die cutting but with the paper still in the nestie to give a white border. Matted onto pink scalloped oval and popped up on foam pads. Paper is My Minds Eye from the Lime Twist collection and I used some ribbon from my stash. Sentiment is from a Personal impressions set and punched before popping onto foam pads again.
Very simple card, but I am quite pleased how it turned out.

It also fits the following challenges nicely:

Samples from last Glitterpot Class

While I was here at my blog to give you the colours for the previous card, I thought I might as well share a few more cards...
I had the pleasure of teaching a class on "Blooming Copics" recently and I haven't shared the pics with you yet. I had a wonderful day with some equally lovely people and I think they enjoyed the day as much as I did.
I went a bit overboard again with my samples (as in, making too many...) but that's me, hard to stop me when I started ;-)


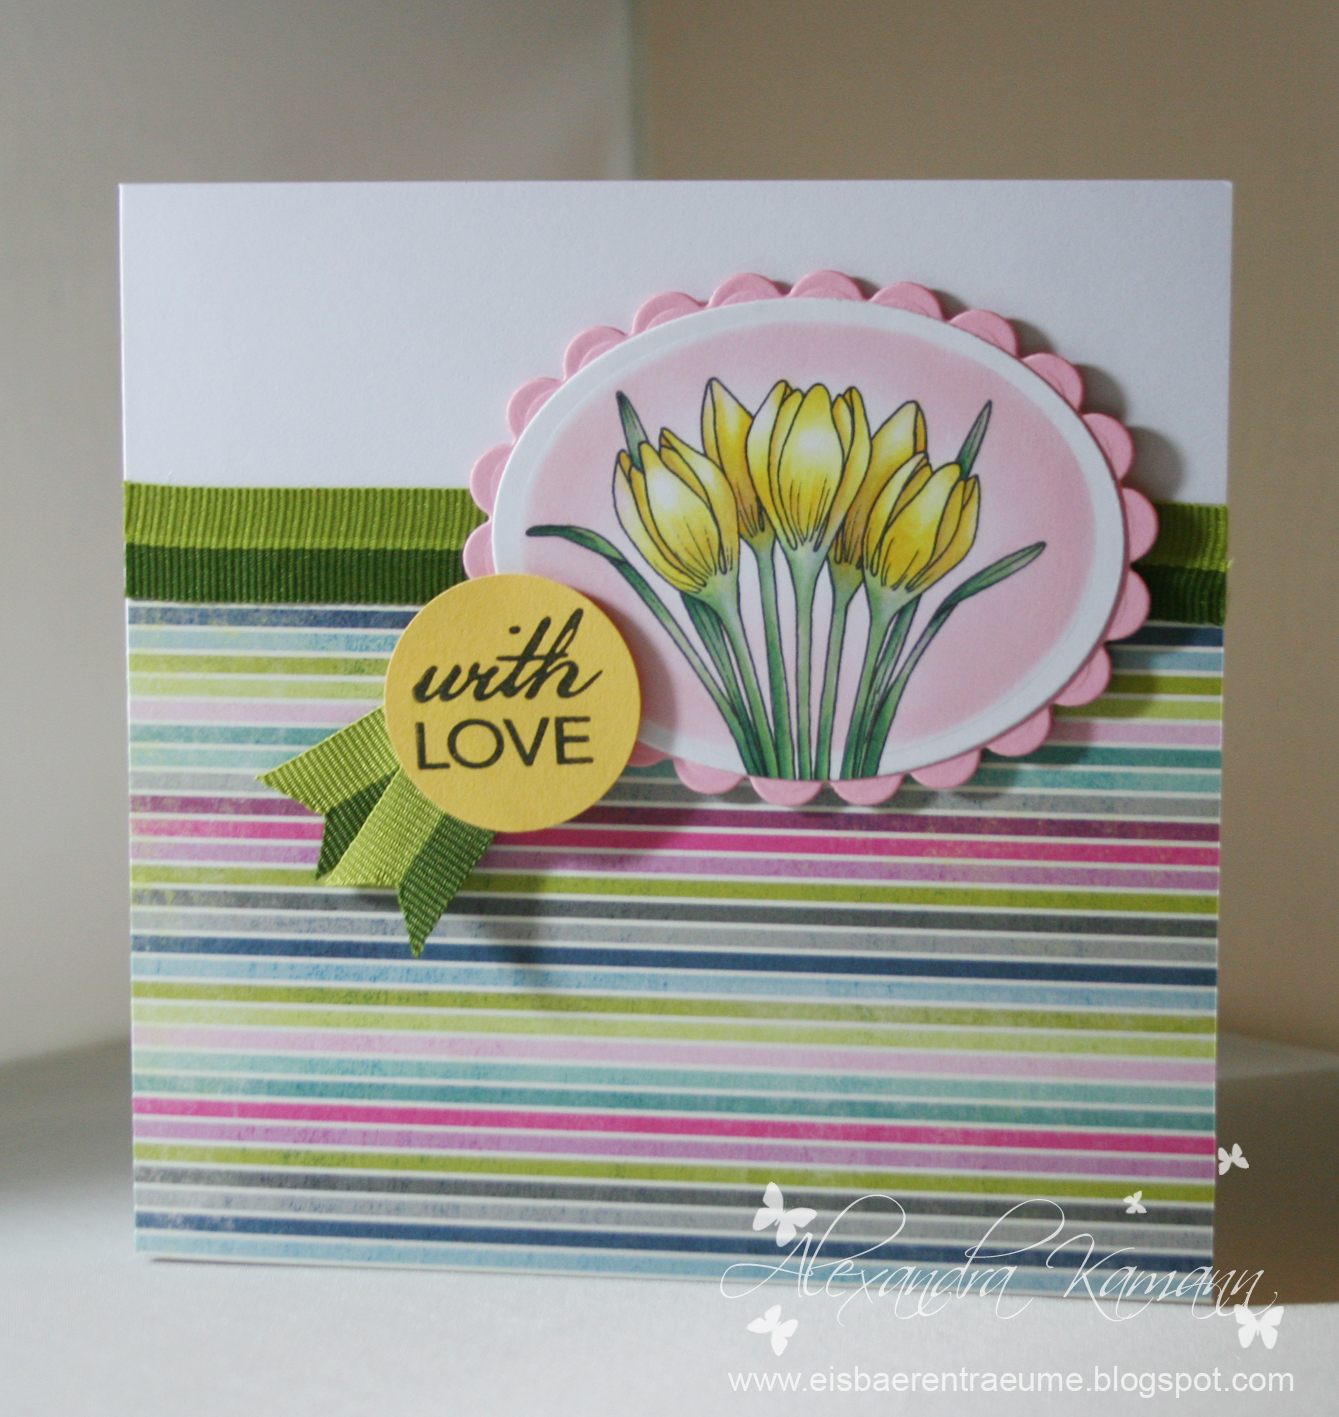
This first one uses the Penny Black image "Pin-striped" and I used YR07,YR04, Y38, Y19, Y17, Y15, Y11 and Y00 as well as the blender pen on the petals. The stamen were done in Y17. Leaves and stems were coloured in YG67, YG63 and YG61 (plus blender).
I gave the hint of a shadow with T2 on the right-hand side of the flowers.
The sentiment is from a Hero Arts set called "Say it all". 
I matted my image on red card and punched two slits to thread the ribbon through. The bottom part of the background is green cardstock that was embossed with the CB script folder, the paper on the top part is by Echo Park and called Victoria Gardens - Botanical Ballad. It's a lovely double-sided paper with music score on the other side that I used on some of the other cards as well.


For this card I stamped "Cheerful" by Penny Black and coloured with V17, V15, V12 (petals), Y19, Y11 (center), YG63, YG61(leaves and stem) and the blender. I then cut out the flower and pop it up with silicon glue onto the aforementioned Echo Park paper that I swiped with a bit of Tea Dye distress ink. 
I cut a frame from green cardstock that I embossed with a pretty damask CB folder swiped with white ink and added some spotty lilac ribbon before adhering with foam pads. 
Sentiment from Hero Arts again.


Now on to some poppies cards... The images are from the Hero Arts set called "Delicate Blossoms" and for this yellow version I used Y17, Y15, Y11, Y00 and the blender for petals, G28, G24 and G21 for stems/leaves and RV000 for the background. Matting in yellow and a die cut Marianne design branch from the same card. Sentiment from Hero Arts again, stamped in pink rather than black this time.
Backing paper (sorry, forgot the make!) was cut with the Nesting Doorplate die by X-cut. 


This time I coloured my poppies in blue with B28, B26, B24, B21 and blender, stems in G29, G28, G24 and G21 and the background was dotted in C4, B24 and G24, I used C1 to blend. Green card matt, paper and sentiment as before and some ribbon loops to complement the paper.


Now some red big poppies! I used R89, R37, R35, R32 and R30 for the petals, G28, G24 and G21 for stems and B000 for background and added a bit of faux stitching to the panel before adding it to the red card panel. I heat embossed the Tim Holtz sentiment with white embossing powder and added a couple of pieces of ribbon before glueing everything to the card blank.


For this (last!) one I decoupaged the two largest flower heads but it's hard to see in the picture. You can always click on any picture to see a larger version!
The petals are coloured with R85, R83, R81 and blender, stems are YG65, YG63 and YG61 and background is Y21. Y21 is called buttercup yellow and I love this colour! I matted this panel on pink card and mounted with foam pads after first stamping the narrower image in pink ink in different heights from the top left and bottom right. The sentiment is a Tim Holtz one again.

Hope you like my cards, feel free to leave me a comment!

Copic Numbers for my tulips jar...

Hello bloggers,


as I have seen some of you at least want to know what colours I used to do the tulip jar image in my last post, I thought I'll oblige and give you the details on it.


Right, let's get to it:


I use the blender pen a lot as well as BV00 and BV000 for shadowing on all of it, so I won't mention those separately in every step.
For the leaves I used YG67, YG63 and YG 61.
The yellow tulips were done with Y17, Y15, Y11 and Y00 plus a little Y38 for the darker sections.
For the red tulip uses R59, R29, R27, R24, R22 and R20.
The white/yellow one is done with Y21, Y00.
The light pink one in the bottom left corner uses R81 and a tiny bit of R83.
I've done the lilac ones with V17, V15 and V12.
For the jar screw-top and the shadow on the ground I used C5, C3, C1 and C0 and for the glass BG13, BG11 and BG10.
You might not have noticed in the picture but I used B000 on the upper right background to give a hint of a backdrop as well.


Hope this helps some of you and I'll try to write down colours when I post next times right away!


P.S. Just in case you didn't know, you can always click on any pictures in my posts to see a larger version!

Thursday 19 January 2012

Is it spring already? Is it, is it? Pleaaaase...?

No? Sure? Oh dear... my card is a little early then.... :-) Hope you don't mind, though.


I made this card for the meet-up earlier this month to showcase a little bit of Copic colouring. I used a couple of Stamp sets by Papertreyink and the coordinating Jar Label die for the sentiment.
The border is also a PTI die. The image was matted onto turquoise and chocolate cardstock.
Background paper is by Prima, matted onto chocolate card and the Organza ribbon is from stash.
 I really should get into the habbit of taking picture of the colours I use for colouring in my images... I see that done on several blogs. Is that something you, my readers want? Let me know and if you do I'll make an effort to do it!
Here's a close-up of the focal image:


Hope you like my offering today and please leave me a comment if you do!

Monday 16 January 2012

First cards for Hobby Art

Hello there!

Surprised to see me blogging again only two days after my last post? Hehe, I intend to be better at this blog than I used to be. I know I said it before but I really am trying to be a good blogger now!

As I had promised in my last post, I have some pictures for you of cards I made with the gorgeous Hobby Art stamps. The playday had its effect on me and I really enjoyed making these.
So here we go, first up the cards I made with the artwork that I made on the Saturday at Hobby Art after the tutorial by Kim.


This was the first card I made with the faux mother of pearl technique. I used Seedless Preserves Distress ink and on top of acrylic pearly paint and stamped the script background in the same ink. I stamped the Bordered Poppies stamp in Versafine Black and coloured with several Distress Inks before glazing the flower heads with Glossy Accents.
For the background I stamped the single poppy stem from the Poppies Scene-it set all over randomly (in Dusty Concord DI) and sponged some more on the edges and the flower heads.
My main panel was wrapped with ribbons and matted onto lilac pearlescent card before mounting the whole thing onto a purple card blank.
Here is a close up of the poppies:


After lusting over the colours that Jane had used I had a go myself with those same colours, here is the result:


I really like the pop of the colours in contrast to the black card blank. I used Iced Spruce, Evergreen Bough and Scattered Straw on the image, mounted onto yellow-orange cardstock and tied some black embroidery floss around before mounting onto the card. Simple, but I love this one!

Next up was my attempt to use some Copics with the faux mother of pearl technique...


I used Rusty Hinge, Wild Honey and Mustard Seed on the background, stamped the poppies and leaves with Memento ink and coloured with Copics. I stamped the large flower heads again on some spare card and coloured them in with Copics before fussy cutting and glueing them in place. I am not quite sure if they just pop more that way or if it looks a little weird with the stark highlights on the soft backdrop...? 
I matted onto red and copper metallic card before mounting onto a square cream card base that I had embossed with a square frame. The sentiment is from the Scene-it Sentiments set.

Jenny also let me have a go at the new Roses and Lilies sets and here is what I made with them:


I really fancied colouring on Kraft card again after not having done that for a while and thought these images would be nice for that. Here I used the large Lilies image and coloured it in with pencils before cutting it out with a Nestie shape and making a light green matt for it. I matted the background paper (SU) onto the same cardstock and used some yellow gingham (Papermania) for the panels behind the foam popped image. Some small pearls to add interest and sentiment from the Friends set by Hobby Arts. Not entirely happy with how that turned out as I added it after the rest of the card was finished and it didn't come out properly, but I think I can just about get away with it.


This one is the large Rose image, again stamped onto Kraft card and coloured with pencils. I went for a bit of a vintage look on this and used some lace I got from my late grandmother to frame the image. I cut it out with a Nestie oval and glued the lace behind as well as adding a bow made from it to the bottom.
For the backing paper I used more Kraft card and a large piece of lace that I layered over and airbrushed onto the card with Light Walnut Copic. When you remove the lace afterwards you get this lovely soft image of the lace. I lightly distressed the edges to add to the effect and mounted the whole thing onto a black card base.


For my last card I used the same image again but this time used Copics to colour, cutting out with a Nestie circle die and mounting with a yellow scalloped circle. Background paper is that yellow gingham again, layered onto pink card before mounting on to a white square card base. Sentiment is from the Friends set again.

Hope you like my offering for today, I'll be back with more cards soon, promise!

Saturday 14 January 2012

Exciting news!

Hello everyone!


Another quick post from me again, haven't got anything to show you today (but some cards are waiting to be photographed in better light so should be posting again soon!), but as the news are out elsewhere I thought I'd shout it out here as well ;-)
I am very honoured to say I have been invited to be a part of the lovely Jenny Mayes' Design Team for Hobby Art! I have met Jenny a few times in the Glitterpot and she is such a lovely lady! Last weekend she had arranged a little crafty play day and I was very happy to be invited. It turned out to be a very enjoyable and inspirational day and I got to meet some more extremely talented ladies as well as see Jenny and the wonderful Jane Gill again. Kim Reygate showed us a great technique to make faux mother of Pearl backgrounds, I probably put on two pounds just by looking at the food that Jenny had put on the table and
all that talent around me made my mojo just do somersaults as I couldn't stop creating afterwards *lol*
I'll try to get some pics done of my creations from the play day and my frantic creating time after as soon as my family gives me more than five minutes to catch up on my blogging.


ANYWAY.... I am sooo pleased! I already own a few of the Hobby Arts sets and admired most of them before and now I can't wait to get to play with all the new sets as well! Woohoo :-)

Sunday 8 January 2012

Give away!

Just a quickie from me: Ruth on A Passion for Stamps has a great giveaway going at the moment:

 You can win these Promarkers plus 5 of her fab digi images!

Pop over to her blog HERE and follow the simple steps to be in with a chance to win.
Good Luck!